


Selling a home starts in the space buyers see first, the living room. This article gives practical, photo-ready improvements that elevate scale, light, and flow buyers notice in seconds. Bella Staging shows you how to apply home staging tips living room strategies that feel natural, look great in photos, and help listings move faster.
Highlights
- Buyer-first layout: Edit scale and float seating to unlock visual space.
- Layered lighting: Combine ambient, task, accent to brighten photos and walkthroughs.
- Neutral foundation: Use a calm base, repeat two accents to broaden buyer appeal.
What is Home Staging For Living Room?
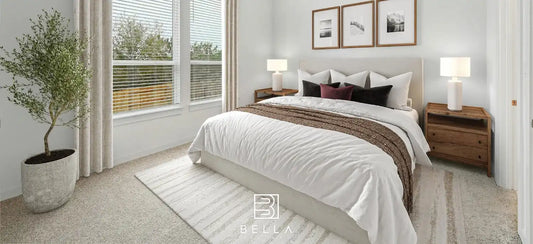
Home staging for the living room is a focused process that elevates scale, light, and flow so buyers instantly grasp how the space works. The goal is to define clear pathways, center a single focal point, and balance styling that photographs beautifully while feeling welcoming at showings. To test layouts and palettes before install, use 3D rendering services so you can visualize lighting, furniture placement, and color choices with confidence. In practice, living room home staging aligns layout, surfaces, and layered lighting so the room reads larger, calmer, and more valuable.

Buyer Psychology in Living Room Staging
Buyers scan a living room in seconds. They look for balance, an obvious conversation area, and a comfortable distance between pieces. If visual noise is low and the focal point is clear, they feel at ease and linger longer. Applied consistently, home staging tips living room techniques reduce doubt, increase perceived quality, and encourage stronger offers. Current staging patterns and results are summarized in the NAR Profile of Home Staging.
Photo-first Composition Basics for Living Rooms
Listing photos decide whether shoppers click through. Compose for the camera by lowering viewpoint to seated eye level, keeping vertical lines straight, and capturing corner-to-corner angles that widen the frame. Tidy cables, center the focal point, and keep reflective glare off screens and glass. These home staging tips for living room moves translate directly into more compelling thumbnails. Warm, consistent color temperature helps images read true, which aligns with LED lighting guidelines.
See more: How Much Does Home Staging Cost? Tips to Save Money
Staging a Living Room to Sell, Step by Step
Use this practical sequence to turn a lived-in room into a buyer-ready asset. Move through each step in order, snapping a quick phone photo after each pass and comparing it to typical MLS crops. For rapid visuals, upload your shots for Bella Staging’s same day virtual staging, then choose from Branded or Unbranded catalogs so buyers can shop the exact look. This repeatable workflow ensures your living room staging shines in photos and in person.
1. Declutter and Deep Clean
Start with subtraction. Remove duplicates, oversize decor, and extra seating that blocks pathways. Clear surfaces to a few purposeful groupings and clean to hotel standards. If a room only needs digital edits before you list, use virtual furniture removal and replacement to delete bulky items in photos, drop in cohesive pieces, and preview scale without moving a thing. Crisp lines and dust-free finishes let natural light bounce, while fewer objects prevent distraction. With this base set, other home staging tips for living rooms become faster and more effective.
- Surface reset: Clear coffee table, console, and one side table.
- Pathways first: Open routes to seating and exits for easy flow.
- Hotel clean: Windows, shades, and floors spotless to boost light.
2. Scale and Flow
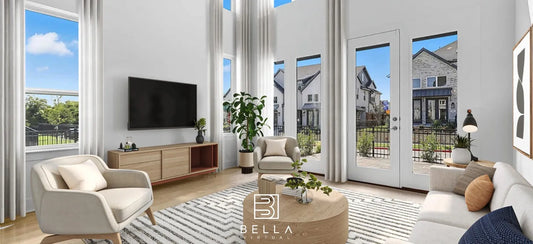
Right-size the big pieces, then float seating a few inches off the walls to open sightlines. Aim for generous walkways and a conversation radius that feels natural. If a sectional swallows the room, swap for a slimmer sofa and a lightweight chair. These layout-driven home staging tips living room choices make the space feel larger without changing square footage. Adjust spacing until the room feels calm and connected from the entry.
- Right-size sofa: Choose lengths that fit wall and rug dimensions.
- Float seating: Pull furniture off walls to widen visual width.
- Clear corners: Free sightlines to windows and focal walls.
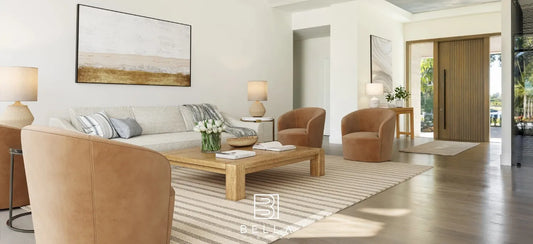
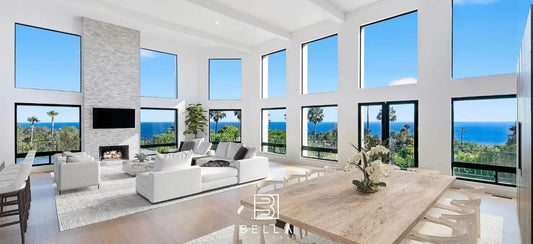
3. Define One Focal Point
Choose a single anchor such as a fireplace, view, or balanced art. Center a coffee table on that axis and orient seating to face it. Eliminating competing focal points calms the scene and guides the eye. As a result, photos read clearly and buyers intuitively understand how to use the room. This is one of the simplest home staging tips living room wins that improves both thumbnails and walkthroughs.
- Pick the anchor: Fireplace, large art, or a notable view.
- Seat to face: Arrange chairs to reinforce conversation and focus.
- Simplify decor: Remove extras that compete with the main feature.
4. Layer Lighting
Build three layers. Ambient ceiling light sets the baseline, task lamps support reading and conversation, and accent lighting models depth on art or shelves. Use consistent warm bulbs and translucent shades to soften shadows. Good lighting multiplies all home staging tips living room effects because it reveals texture, color, and the room’s best angles. Target a warm 2700–3000K range for inviting photos and comfortable showings.
- Ambient base: Even ceiling light without harsh hotspots.
- Task add: Lamps near seating and reading positions.
- Accent finish: Picture lights or uplights for depth and interest.
5. Neutral Palette with Two Accents
Keep the walls and main upholstery neutral to maximize buyer appeal, then echo two coordinated accent hues in pillows, throws, or art to create rhythm. Restraint reads intentional and upscale, while layering organic materials like linen, wood, rattan, or stone, adds depth and tactile contrast.

This palette discipline is central to effective home staging tips for the living room because it keeps both listing photos and walk-throughs cohesive. Natural textures also cue calm by tapping a well-documented idea known as the biophilia concept (the innate human attraction to nature), which helps explain why nature-inspired finishes make spaces feel more welcoming.
- Neutral base: Light walls and sofas to brighten the frame.
- Two accents: Repeat colors for cohesion and memorability.
- Organic texture: Linen, wood, stone to add quiet depth.
6. Style Key Surfaces
Focus on three surfaces: coffee table, console, and one side table. Use simple groupings with negative space. Vary height and shape for interest without clutter. A stack of books, one sculptural piece, and a low floral read cleanly. This restrained styling ties the scene together and supports other home staging priorities like scale and flow. Keep objects aligned to the focal point and camera angles.
- Rule of three: Book stack, sculpture, and a low floral.
- Vary heights: Triangle compositions photograph cleanly.
- Leave space: Negative space keeps the eye moving.
7. Hide Cords and Tame Tech
Conceal cables with cord covers and route power to the rear of furniture. Downplay an oversized TV by balancing the wall with art or shelves. Reducing visual tech noise makes buyers feel calm and helps listing photos look intentional. These quiet home staging tips living room details often separate average from standout presentations. Check glare on screens and glass before shooting.
- Cable control: Route and bundle for clean lines.
- Scale tech: Right-size TV or offset with art.
- Matte finishes: Reduce reflections in photos and showings.
8. Add Greenery and Texture
One tall plant near a corner, a textured throw, and two pillows per seat add life without clutter. Natural textures soften edges and help the camera read depth. Keep planters simple and avoid blocking light.

When combined with neutral upholstery, this set of home staging tips living room touches makes the room feel fresh and move-in ready. Rotate plants to keep foliage facing the lens.
- One tall plant: Fills dead corners and adds height.
- Textile warmth: Throws and pillows for easy softness.
- Simple pots: Neutral planters that disappear visually.
9. Photograph for MLS Thumbnails
Stage for the lens, then for the walkthrough. Shoot from seated eye height, stabilize the camera, and keep verticals straight. Capture a wide opener and a few vignettes that highlight the focal point and pathways. Effective images prove your home staging tips living room work and drive more showings. Review thumbnails at phone size to verify clarity before publishing.
- Seated height: Natural perspective that flatters dimensions.
- Straight verticals: Correct lens tilt to avoid distortion.
- Hero shot: Lead with the focal point and clear pathways.
10. Showing-day Touches
Before each tour, reset cushions, open blinds, and turn on all lights. Check scent, temperature, and door swing so the first impression is effortless. This final pass preserves the clarity you created with earlier home staging tips living room steps and keeps buyer attention on the room’s strengths. Keep towels, wipes, and a small bin handy for quick resets.
- Full lighting: Turn on every layer before buyers arrive.
- Air and scent: Freshen without strong fragrances.
- Fast reset kit: Cloths and bin for quick tidy-ups.
How Bella Staging Helps You Stage a Living Room Fast
Bella Staging translates your property photos into styled, on-trend images in about 24 hours, so you can launch quickly. If you are planning a vacant or refresh project, start with our virtual staging workflow to upload photos, choose looks aligned to neighborhood comps, and specify target buyer profiles. Designers then deliver MLS-ready compositions that read clearly in thumbnails and on mobile. The result is a fast, reliable application of living room staging principles that attracts clicks and in-person tours..
Bella Staging also provides a clear revision process, color-accurate outputs, and guidance on camera height and angle to ensure your finished images feel real, not generic. You receive a room-by-room checklist, suggestions on scale and flow, and optional alternates for different buyer segments. Compared to generalist providers, the service emphasizes measurable listing KPIs, like click-through and days-on-market reductions, giving you more value and confidence.
See more: Is Home Staging Worth It? 10 Reasons Sellers Say Yes
FAQs: Home Staging Tips Living Room
1. What are the most important home staging tips living room sellers should start with?
Begin with scale and flow, establish a single focal point, and layer lighting. These changes unlock space without major expense and help photos read cleanly. When furniture fits, pathways feel open, and light is warm and even, buyers relax quickly and engage with the room longer.
For a fast start, measure the room, pull furniture off walls, and test two seating layouts. Next, select one focal wall and center the coffee table on that axis. Finally, add two table lamps and check color temperature for warmth. These simple steps raise perceived quality and make photos inviting.
2. How many decor items should go on a coffee table when staging a living room?
Use a simple three-piece arrangement that balances height, mass, and open space. Think a low floral, a sculptural object, and a modest book stack. This reads cleanly in photos, keeps traffic paths clear, and supports other home staging tips living room goals like a calm, uncluttered focal area.
Try this: pick a medium tray, place a short floral on one side, a small sculpture on the other, and a slim book stack centered. Adjust spacing until the triangle feels balanced from the main camera angle and the seating positions buyers will test during showings.
3. Do mirrors actually help in a staged living room or feel gimmicky?
Mirrors help when they are tall enough, simply framed, and placed to reflect light or depth rather than clutter. Position opposite windows or adjacent to a focal wall. Avoid small, busy frames. Used this way, mirrors amplify natural light and support home staging tips living room outcomes without feeling contrived.
Stand in the main photo position and check the mirror’s reflection. If it captures a window, plant, or focal wall, keep it. If it doubles clutter or cuts through seating awkwardly, move or remove it. Aim for reflections that widen the room and reinforce the focal point.
4. How bright should a staged living room be for listing photos and showings?
Aim for even, warm illumination across the room. Combine ceiling light with two lamps and one accent source, then open blinds for daylight. Consistent color temperature makes finishes look richer. Proper brightness ensures your home staging tips living room work is visible in photos and comfortable during tours.
Before shooting, replace mixed bulbs with warm 2700–3000K options, wipe shades, and turn on every layer. Do a quick phone exposure test from seated height. If faces or fabrics look dull, add a lamp or raise shade translucency. Balanced light improves thumbnails and buyer comfort immediately.
Conclusion
These ten home staging tips living room steps make rooms look larger, brighter, and more valuable in photos and showings. Bella Staging delivers styled images in about a day, helping listings launch faster with confidence and clarity. If you want expert help translating these ideas to your listing, contact us to discuss options that fit your timeline and budget.